The night was still, but my mind was restless. It was now midnight—the very time when my thoughts usually wandered. In a short span, my life journey, from being a curious child to becoming a weary 35-year-old man, replayed in my mind like a movie. My beloved wife and sons, were sleeping peacefully, safe and sound.
I was born a Catholic Christian. I have read the Bible from beginning to end twice—once in primary school and again in senior high school. In adulthood, I also explored evangelism, zoroastrianism (also known as Majusi here in Indonesia), islam, buddhism, hinduism, and other faiths. But for most of my life, I believe I have been an agnostic, especially since reading The Song of the Bird by Anthony de Mello. That book belonged to my older brother, Donald, who was a priest candidate at the time.
Perhaps I am simply exhausted from a recent project at work. Perhaps my mind is burdened by recent events in my life.. or perhaps I am questioning the very point of life itself.
I have been contemplating my existence, my beliefs, and the nature of God. Recently, the world has felt fragmented—too many contradictions, too many paradoxes. The deeper I think, the more uncertain everything becomes.
I tried to calm myself by searching for some soothing music on YouTube. I picked a familiar title: Tantum Ergo Sacramentum. As I listened, I was transported back more than ten years ago, inside a catholic church in South Jakarta. A woman sang this hymn beautifully. It was so peaceful.
….
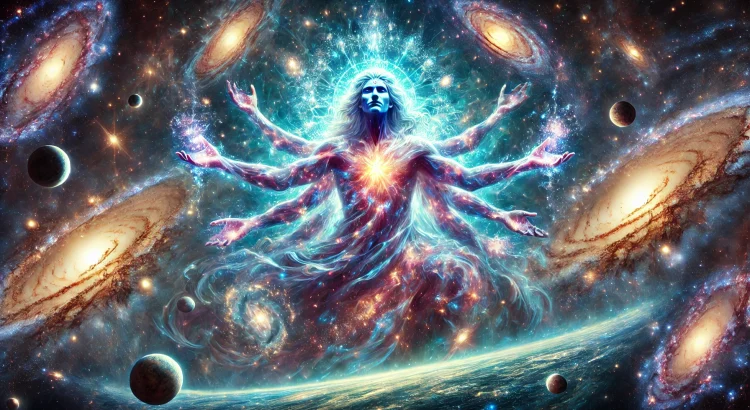
Then, something happened. The space around me seemed to stretch, fold, collapse. I felt myself being pulled—not physically, but conceptually—into a realm beyond understanding. When I opened my eyes, I was nowhere and everywhere. Before me stood a presence—vast, immeasurable, yet intimate and familiar. I knew, somehow, I was standing before God.
As I took a step forward, I noticed something on the ground—a small, worn leather wallet. I picked it up, turning it over in my hands. Inside was an old ID card, the name barely visible: Neale DW. A strange feeling washed over me. Someone else has been here before. But there was no time to dwell on that. Now, it was my turn to have the conversation.
A Conversation Beyond Time
Me: Where am I?
God: Where you have always been. Only now, you are aware of it.
Me: Am I… dead?
God: (laughs softly) No. You are thinking. Deeply. And when a mind truly seeks, it finds itself here.
I took a deep breath. This wasn’t a dream. It wasn’t imagination. It was something else. And if I was here, I needed to ask the questions that had been haunting me.
Me: Are You… One? Truly, indivisibly One?
God: Yes. I am the Absolute One. I am unchanging, indivisible, the foundation of all reality.
Me: But how? How can You be completely One when so many religions describe You in different ways?
God: Think of the number one. A perfect integer—whole, indivisible, fundamental. Everything else is built upon it. Just as all numbers are multiples of one, all of existence flows from Me. This is how strict monotheism understands Me. (Absolute Integer)
I frowned. The answer made sense, yet something still felt incomplete.
Me: But numbers can be divided. One can be split into fractions. Doesn’t that mean unity can be broken?
God: That is an illusion of perspective. When you divide one, you are not truly breaking it—you are merely representing it in different ways. One remains one, even when expressed as 1/2 + 1/2. Likewise, I remain indivisible, even when perceived in different ways by different minds.
Me: So You are saying strict monotheism is correct? That You are a singular, unchanging entity?
God: From one angle, yes. But the problem is not with strict monotheism—it is with how humans perceive it. They think of Me as a distant, fixed point, an unmovable force. But an absolute integer is not just a number—it is a foundation, a principle upon which everything else is built.
The Foundation of Reality
Me: But how does this absolute Oneness explain the universe? If You are One and unchanging, then why does change exist?
God: Because change exists within the system, not outside it. Imagine a perfect mathematical function—an equation that governs reality. The equation itself does not change, but the values that flow through it do. My Oneness is the equation, the fundamental truth upon which the universe operates. Everything else is the expression of that truth.
I tried to grasp it. The idea was both simple and overwhelming. If God was the absolute integer, then everything else was just a derivative of that singular truth.
Me: But some people say that You have a form, a shape, a presence that can be seen and understood. How does that fit with being an indivisible One?
God: Humans understand through metaphors. When they say I have a form, they are not wrong—they are just limited in their perception. A single number can be written in infinite ways. One is 1, but it is also 3/3, 100/100, or the square root of itself. Likewise, I am perceived in different ways, but I remain the same.
Me: So… different religions see different fractions of You?
God: You are beginning to understand. But do not think of it as mere fragments. Think of it as different perspectives on the same indivisible truth. Some see the integer, some see the fractions, but all are looking at the same fundamental reality.
I let the thought settle in my mind. This was different from how I had always viewed monotheism. I had imagined God as a singular point, separate and distant. But now, I saw Him as the foundation of everything—the integer upon which all numbers rest.
The Pitfalls of the Absolutist Angle
Me: But isn’t there danger in thinking that one view is the only correct one? Many religions claim absolute truth and reject all others.
God: Ah, now you see the paradox. If one believes only in the absolute integer without acknowledging the different ways it is expressed, they become rigid, unwilling to accept anything beyond their own perception. This is the pitfall of absolutism.
Me: So, strict monotheism can become a trap?
God: Any idea, when held too tightly, can become a prison. The belief in absolute truth is not wrong—it is essential. But when it turns into exclusion, division, and hostility toward differing perspectives, it loses its purpose. The integer is still One, but many refuse to see that others are describing the same Oneness from a different angle.
Me: Then why do some religious traditions become so rigid?
God: Because humans seek certainty. It is easier to believe in a static, unchanging truth than to accept paradox. Certainty gives security, but it also limits growth. The danger of absolutism is that it leads to exclusion, and exclusion leads to conflict. Many wars have been fought not because of different gods, but because of different interpretations of the same One.
Me: So, strict monotheism must be balanced with openness?
God: Exactly. The integer is absolute, but its expressions are infinite. If one clings to only one form, they miss the beauty of the whole.
The Illusion of Division
Me: So if You are truly One, then why do some traditions insist that You have multiple aspects? Isn’t that a contradiction?
God: It is not a contradiction—it is a paradox. And paradoxes are only contradictions when viewed through limited understanding. Consider light. Is it a wave or a particle? Science tells you it is both. The answer depends on how you measure it. (Wave-Particle Duality)
Me: You mean… that how we perceive You changes what we understand?
God: Exactly. To some, I am the Absolute Integer—indivisible, unchanging. To others, I am dynamic, interacting, relational. But I remain One, just as light remains light whether you see it as a wave or a particle.
I stood in silence, absorbing everything. And yet… something still lingered in my mind. If God was truly One, how did the idea of the Trinity fit into this equation?
A knowing smile played on God’s presence.
God: Ah. Now you are ready for the next question.
And with that, the space around me shifted, preparing for the next lesson…